Wednesday, May 4, 2011

Cinco de Mayo Tacos

We rearranged our nights so I could post this before Cinco de Mayo. This recipe was adapted from Food and Wine.  The tacos are light and perfect for a quick summer meal.

I used chicken from our roasted chicken but you could also use a rotisserie chicken. On a side note, it's so much easier to shred warm chicken than cold chicken. Maybe that's obvious to most people but this whole roasted chicken thing, totally new to me.

Chicken Tacos


Shredded Chicken
Roasted Poblano Peppers (instructions below)
Sour Cream 
Heavy Cream
Coleslaw Mix
Salsa
Flour tortillas
Avocado (sliced)


1. Mix 1/2 cup of sour cream with 1-2 Tbsp of heavy cream.
2. Heat flour tortillas wrapped in damp paper towels in the microwave for thirty seconds.
3. Put poblano peppers, chicken, avocado, salsa, sour cream mixture and coleslaw mix into a tortilla. Enjoy!


Roasted Poblano Peppers

1. Move oven rack to the top position (closest to the broiler) and put the oven on Broil.
2. Cover a cookie sheet with aluminum foil. Place peppers on pan and put in oven. 
3. Monitor the peppers. Once they char on one side (approx. 5 minutes), flip them over so that all sides are charred.
4. Remove from oven and place peppers in a bowl. Cover bowl with plastic wrap and let peppers cool.
5. Remove skin and seeds. Slice into strips.

How to Roast a Chicken

Before
I had several excuses of why I shouldn't roast the chicken. Besides, the "I'm terrified" excuse, I also end up eating lunch at 4:00. Why make dinner when I ate so late? Then I remembered that the important thing here was the trial run of Sunday's dinner so I poured some wine and faced my opponent.


Prep
After a half glass of wine, I was ready to tackle the project. The first baffling direction was to use a head of garlic, cut horizontally. I reread it a few times, eyed the garlic and then did my best to not cut off my fingers. Success.

Next I had to cut two slices of baguette and put them in the bottom of the pan. This would serve as the roasting rack.

There was no time for introduction and before I knew I was rubbing salt and pepper generously on the outside AND inside of the chicken. After the initial,"ewww," I got over it. To keep things sanitary, I poured some salt and pepper into a prep bowl for easy access. This was fine until I accidentally dumped the prep bowl on our newly cleaned hardwood floors. Sigh. I really try to keep the kitchen clean despite what Manatee thinks.

The recipe also mentioned that if the liver was included, to stick the liver of the chicken inside the chicken. So, I don't really know if there was a liver. Not really sure how to identify a chicken liver. I didn't take anything off of it, so I think I am good there. Liver or no liver, I got through that step. After jamming some fresh herbs and the bizarro half head of garlic into the chicken, I was ready to get it cooking.


Then came the frantic phone call to my mother. Do I use the cover of the Dutch oven or leave it uncovered? She advised covering it so I set up the oven so that I can monitor the handle of the Dutch oven. I am not worried as much about the chicken as my handle melting off and starting a house fire. Then of course, having to explain to Manatee when he gets home from his business trip how I managed to burn down the house in his absence.

Chicken is cooking..
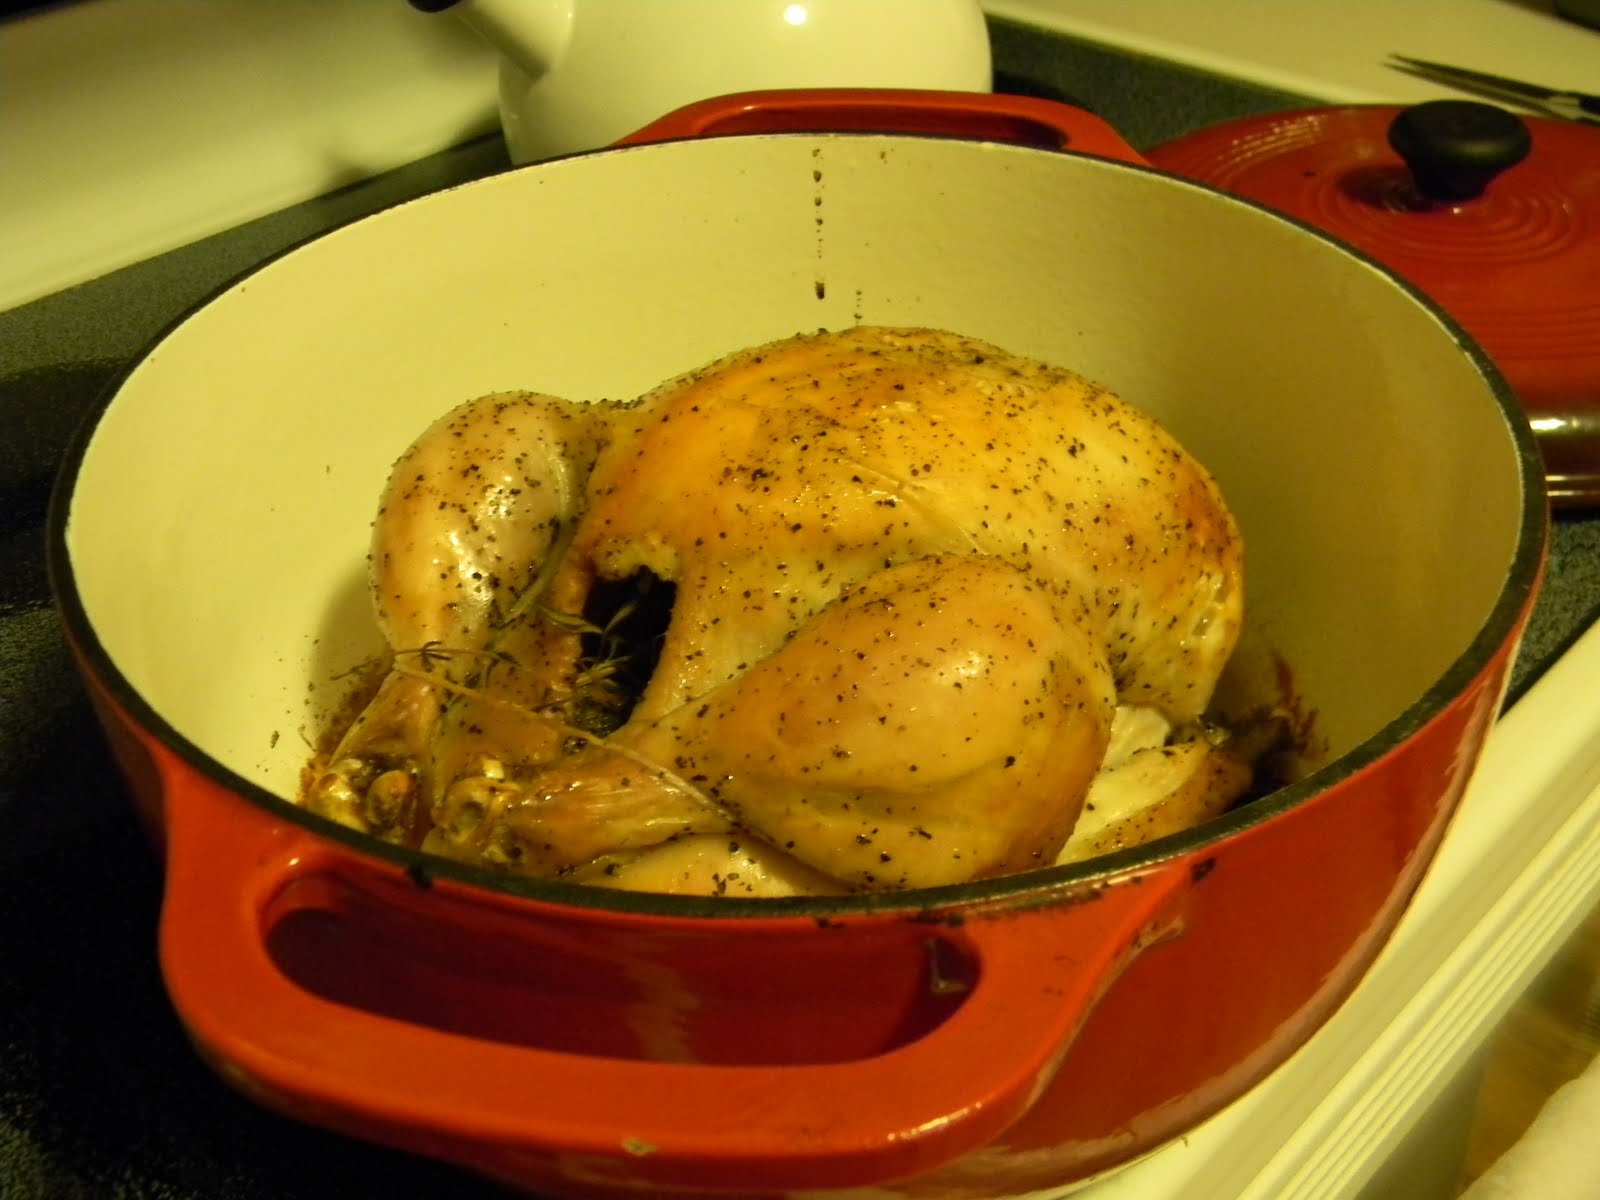
The beauty of this recipe is that you let it cook for 90 minutes, uninterrupted. As it was cooking, I realized I had no idea what to do with the chicken after I took it out of the oven. I knew I let it rest for 5-10 minutes, but after that, I didn't know how to cut a whole chicken! Good thing this was a test run. Second frantic call to my mother was not helpful. "But you've bought rotisserie chickens?" I protested. "Rotisserie chickens just fall apart when you touch them." Not helpful mom, not helpful at all.

And Voila!


Golden, succulent roasted chicken. Success! After almost dropping it on the ground and discovering you really need two people for the transfer, I got the chicken on a makeshift platter. Notice there are no pictures of chicken post-cutting? It wasn't pretty. Will need to research carving a roast chicken before Sunday.
 Now Dorie promised that the bread from under the chicken would be the best part. 


And it was. I couldn't wait to try it as you can see from the picture. I didn't even need chicken after that! It soaked in chicken juices, wine, garlic. Heaven! 

I know I said I didn't need the chicken but I was really curious. Also, a dinner of bread soaked with chicken goodness probably wasn't the healthiest fare. So I sat down at 8:30 and had my trial dinner. While the chicken was cooking, I made some smashed fingerling potatoes and roasted mushrooms (recipe and post to come). As always, I finished the meal off with a spinach salad and my favorite dressing. It's going to be a great Mother's Day feast. 


Monday, May 2, 2011

Weekly Preview: Roasted Chicken, Saffron and CSA

This is a time of transition for me and I realized I need to take some steps to retain a sense of familiarity. The Plan is back. For those of you new readers, I made it a goal months ago to plan our meals by the week. I highly recommend this for anyone who struggles with meal planning. Prior to this, I was trying to plan dinner at 3:00. This led to spending more money on food and not always making the healthiest decisions. Without further adieu, this week's plan:

Monday: Take out.
Okay, I know, I know. I just went on about how this can help with meal planning and making healthy decisions. Reality? I have a lot of work to get done today and I need to grocery shop and Manatee is away on business. I will be good tomorrow but today I need something hot and fast. That being said, take out for me is steamed chicken and vegetables with sauce on the side from the local Chinese place. I will make my own brown rice at home, if I want rice. No oil, no gummy sauces that gave you gut rot. Most Chinese places have a diet menu and if they don't, most will make you a steamed dish with no sauce if you ask for it.

Tuesday: Roast Chicken for les paresseux from Dorie Greenspan's "around my french table." 
Sounds fancy, right? It translates to Roast Chicken for the lazy. That's me. Well, actually I'm terrified, not lazy. I have never roasted a chicken before. This was one of my NYE goals and I am determined to brave through it. This is also an experiment for me. I grew up in a household where the only time we had roasted chicken was when we bought a rotisserie one at the store. This is sharp contrast to my mother-in-law who once butchered a chicken because she wanted to have it for dinner that night. In terms of my cooking, chicken has always been skinless, boneless chicken breasts. I have made chicken legs a few time but that always made me nervous. The idea of having to face a whole chicken, bones, skin and all? I kind of want to hide under the table.

Though I am terrified, I have a sneaking suspicion that it's easier than I think. I also would really like to serve it to my mom and mother-in-law on Sunday. They both love chicken and it feels fancier than serving chicken breasts.  I want to do a test run so I can sleep the rest of the week. I will definitely post before, during and after this cooking adventure. 


Wednesday: Paella.
I am going to adapt a recipe from Betty Crocker's "300 Calorie Cookbook." I am super excited to use my saffron threads. It will be my first experience with saffron and making any kind of paella.


Thursday: Chicken tacos.
I have to use up the shredded chicken some way, right?

Friday: CSA!!
This is the first week of our CSA and I am super excited. I will be doing posts centered on the CSA throughout the summer. Tune in Thursday and Friday for some CSA meal planning and recipes.
What's a CSA? Check out this previous posts on the beauties of Community Supported Agriculture.

Baking for the week: Berry-Cornmeal Pound Cake (courtesy of Martha Stewart). 
It's another test run for my Mother's Day meal. I don't have the anxiety as much as I want an excuse to have some around the house this week and to do some baking. As I always say, 'When the going gets tough, I get baking.' There is something really satisfying about starting with disparate ingredients and an hour later, having something totally different and totally appetizing. It's a great sense of accomplishment.

Hope you will check in throughout the week. If anyone has any tips for preparing roasted chicken let me know. I will be the first to admit that I don't know what I am doing but I am very eager to learn.

Happy eating!


Wednesday, April 27, 2011

Needing help with some fickle Basil plants


I have had a trying relationship with fresh Basil since we first met at Trader Joe's in California. It was a beautiful Fall day and I saw a Sale sign. Being a graduate student, I always paid attention to words after  'Sale.' The plant looked full and beautiful. In its leaves, I saw pesto and....well actually I didn't know much about Basil except that it went into pesto, so all I really saw was pesto. I purchased it and read the growing instructions: place in direct sunlight. When I got home to my meager graduate student housing apartment, I tried it out in several places in our living room. By the couch so it would be close to me when I did my nails (I only allowed myself to watch TV when I did my nails, needless to say I always had really nice nails when I was in graduate school) or across the room so I could look at it when I did said nails (the life of a graduate school lacks a certain je ne sais quoi). 

Now that I had established its home, I called the only person I knew who could cook and asked her how to make pesto. She told me to throw some basil, pine nuts, olive oil and Parmesan cheese in a food processor. Did she tell me how much of each? No. Did I ask? No. I wanted to act like I knew what I was doing. The end result was a green, slimy, inedible mess and an almost bare Basil plant.

Then the real trouble began. My plant began to die. It was slow and painful. I moved it all over the apartment, I talked to it, I coaxed it, I think I even sung to it at one particularly low point. Finally my roommate, Susanna, who didn't talk to me very much told me I should just let it go.

This was a low point in my first semester at graduate school. It may sound trivial but graduate school...well...it sucks. You need these little victories and on top of the great television debacle of 2006, a dying Basil plant did not help my morale. 

As I was bemoaning my state in the graduate student lounge, another student laughed at me. Cruel, I know but graduate students are cruel. Then she sighed, looked down her nose and said "Kimberly, those were end of season basil plants. They're supposed to die. That's why they were on sale." 

Two lessons here: 
1. Always read the words before 'Sale.' Had I read them, I would have seen 'End of Season.'
2. Basil plants die in the Fall. Deal with it.

I stayed away from Basil for a long time and then last summer, I was given a Basil plant through our CSA. It died a terrible death. Granted when I replanted it into a bigger pot, there was only one leaf but I was optimistic. The next day the little leaf was laying on the ground. Did I give up? No. Then it rotted. Did I give up? Yes but I also decided that it was a sacrificial offering to other herbs in the pot and I felt better. 

Now this year I bought two Basil plants. I used a bunch of the leaves and now I am growing concerned. After removing all of the dead leaves, this is what remained.


One is doing significantly better than the other. As I told Manatee, the one on the right isn't dead but it is mostly dead. I guess you could also say it is a little alive but Basil brings out the pessimist in me.  


Any tips for bringing it back to life? 
Any tips for growing fresh Basil?
Making pesto? 
Bueller?

Tuesday, April 26, 2011

Time Saving Tips: Green Bay Packers Curry (?!)


Those of you who know me will know this was not the intention when I made a quick curry dish last week. After I finished it, I realized what I had done: Green fresh basil, Gold curry sauce, Gold peppers, Green broccoli, chicken over brown rice and Green spinach. Sigh. If it hadn't been so good, I wouldn't have photographed it.

Green Bay Packers Curry


1 bottle of Yellow Curry sauce
3 chicken breasts, sliced in thin strips
1 yellow pepper, sliced
1/2 onion, sliced
1 bag of frozen broccoli

1 cup of rice

Optional: Fresh spinach and fresh basil

1. Begin the rice, following directions on the bag. 

2. In a large saute pan or an electric frying pan: heat the pan to medium heat and spray it with olive oil or add a tsp of olive oil, swirling to coat.

3. Add chicken and sauce. Cook for 5 minutes, stir occasionally.

4. Add peppers, onions, and broccoli. Cover and cook until broccoli and chicken are cooked through.

5. For extra veggie bonus, place spinach on plate and then add rice. Serve sauce over rice and spinach. Top with fresh basil if you so desire.

Notes:
*"But rice takes so long! I don't want to wait for that." You can buy a cup of Uncle Ben's brown rice that you can put in the microwave for a minute and it's done. You could also use Instant Rice.

* "What if I don't like curry?" Try another bottled sauce and adjust the veggies accordingly. You could do the same with marinara, pasta sauce, or peanut sauce. 

* "I don't have time to slice vegetables." I happened to have sliced yellow peppers leftover from a pizza party. I could have easily omitted them or used additional frozen vegetables. As I have mentioned before, the frozen vegetables are great time savers and easy to use. When you cook broccoli fresh, they can be woody and hard to work with but frozen broccoli cooks quickly and easily.

Time Saving Ingredients:


Thursday, April 21, 2011

Easter Menu Tag: Appetizers!

I was invited by cajunliscious to participate in an Easter Tag Menu. I really appreciate the invite and hope all of you check out her amazing blog. Here was the invite:


It would involve for each person that is tagged, to come up with 5-10 suggested MENU ITEMS for EASTER. You have to upload these entrees, appetizers, desserts, from your previous posts with the photos, and link them back for the recipe.


Our Easter celebration is usually more of a potluck than a sit down dinner so in keeping with that theme, I decided to focus on recipes for appetizers.  

For some of my recipes, I decided to just paste in the recipe as the blog entry included more information than needed (apparently I have the tendency to ramble).  Some may not be as traditional, but all are delicious. Enjoy!


Balsamic Beets


1 cooked beet sliced
Splash of balsamic vinegar
Crumbled Goat Cheese
Salt
Pepper


Goat Cheese Empanadas


Ingredients:
Refridgerated Pie Crust 
Goat cheese 2 oz per pie crust


Spread out the pie crust. Cut small circles (approx. 3 inch diameter). I used a glass to do this. Put a LITTLE bit of goat cheese in center. Wet the outer edge of the circle and fold over. Then use a fork to press it together and give the edges a nice crimped look.


*You really only need a little goat cheese. I had a terrible experience making ricotta and jam pockets (shudder, cringe) and I put in too much filling. It was a mess! And it was disgusting so it was a lose-lose.


Bake at 375 for 20-25 minutes.


Mushroom Cheese Bread


Ingredients:

1 round loaf bread (preferably day old ot make it easier to cut but doesn't have to be)
8 oz. shredded Swiss cheese
8 oz. shredded Mozzzarella cheese
approx. 1/2 cup chopped sundried tomatoes
1 pear- cut into matchsticks and then cut those in half
6 oz. baby bella mushrooms, coarsely chopped


Sauce:


3/4 cup butter
2 parts poppyseeds (1-1 1/2 Tbsp)
1 part ground mustard
1 part season salt
2 parts lemon juice
3 green onions, finely chopped


Mix together cheeses, mushrooms, sundried tomatoes and pear in a bowl.


Cut the bread in diagnol rows and then cross hatch to you have 1 to 1 1/2 inch cubes. Go almost to the bottom but make sure it is still attached. guests will need to pull apart the bread.
Preheat the oven to 350.
Place bread on foil. Stuff ingredients into the bread. Fill in all crevices.
Melt sauce ingredients in a saucepan. As soon as butter is melted, remove from stove and pour over bread.
Wrap bread with foil. At this point, really work to get the bread back into a round shape by pulling the foil tight across it.
Put bread on cookie sheet and bake 40 minutes at 350.
Remove, Unwrap and Enjoy!


Caramelized Onion Dip

2 Tbsp of unsalted butter
2 medium onions, thinly sliced
1 8 oz bar reduced fat cream cheese
1 cup fat free sour cream
2 Tbsp of chopped fresh chives


Melt butter in large skillet over medium-low heat.
Add onions and 1/2 tsp of salt and pepper.
Cook until deep golden brown- the recipe says 30-35 minutes but that's a vicious lie. I cooked the onions for well over an hour.
Remove onions from heat and let cool.
Mix sour cream and cream cheese together.
Add cooled onions and mix well.
Fold in chives.

Serve with thick cut vegetable chips and veggies.


Tuesday, April 19, 2011

Pizza Puff Pastry Sticks

We had some family over a few weeks ago for dinner and originally I had planned to make Dijon Batonnes- an amazingly easy appetizer of puff pastry and Dijon mustard courtesy of Around My French Table by Dorie Greenspan. As the date got closer and I got thinking more about it, I realized that my teenage nieces may not be as keen on Dijon as I. Confession: I have been known to eat Dijon mustard out of the jar with a spoon. That is how much I love it. 

I knew that I wanted something that would keep the ease of the Dijon version (puff pastry + Dijon + egg wash + sprinkling of poppy seeds) but had ingredients that were a little more recognizable and palpable. The theme of the dinner was make-your-own-pizza so I decided to make a pizza version of the breadstick. Truth be told it was just as grown-up friendly as it was kid-friendly. It was a close race, but we ran out of this version before we ran out of the "adult" Dijon breadsticks.

Pizza Puff Pastry Sticks

1 sheet of puff pastry, thawed
1 1/2 Tbsp of tomato paste
1 Tbsp of chopped fresh basil (or 1/2 Tbsp of dried basil)
1 1/2 Tbsp of shredded mozzarella
1-2 Tbsp of water

Egg, whisked with a little cold water

Italian Seasoning or dried Oregano

  1. Cover baking sheet with parchment paper or spray with Olive Oil spray.
  2. Preheat oven to 400 degrees.
  3. Mix together tomato paste, basil and cheese. Add water until mixture is spreadable. 
  4. Roll out puff pastry dough so that it is about 12 x 16 inches.
  5. Cover lower half (on the short side) with tomato mixture leaving 1/8 inch around the edges.
  6. Fold dough over and seal around edges.
  7. Using a pizza cutter, cut into 1 inch strips.
  8. Transfer to baking sheet. 
  9. Brush on egg wash and sprinkle with Italian Seasoning (or dried Oregano).
  10. Bake 7 minutes. Rotate pan. Bake 7 more minutes or until golden brown.