Wednesday, April 27, 2011

Needing help with some fickle Basil plants


I have had a trying relationship with fresh Basil since we first met at Trader Joe's in California. It was a beautiful Fall day and I saw a Sale sign. Being a graduate student, I always paid attention to words after  'Sale.' The plant looked full and beautiful. In its leaves, I saw pesto and....well actually I didn't know much about Basil except that it went into pesto, so all I really saw was pesto. I purchased it and read the growing instructions: place in direct sunlight. When I got home to my meager graduate student housing apartment, I tried it out in several places in our living room. By the couch so it would be close to me when I did my nails (I only allowed myself to watch TV when I did my nails, needless to say I always had really nice nails when I was in graduate school) or across the room so I could look at it when I did said nails (the life of a graduate school lacks a certain je ne sais quoi). 

Now that I had established its home, I called the only person I knew who could cook and asked her how to make pesto. She told me to throw some basil, pine nuts, olive oil and Parmesan cheese in a food processor. Did she tell me how much of each? No. Did I ask? No. I wanted to act like I knew what I was doing. The end result was a green, slimy, inedible mess and an almost bare Basil plant.

Then the real trouble began. My plant began to die. It was slow and painful. I moved it all over the apartment, I talked to it, I coaxed it, I think I even sung to it at one particularly low point. Finally my roommate, Susanna, who didn't talk to me very much told me I should just let it go.

This was a low point in my first semester at graduate school. It may sound trivial but graduate school...well...it sucks. You need these little victories and on top of the great television debacle of 2006, a dying Basil plant did not help my morale. 

As I was bemoaning my state in the graduate student lounge, another student laughed at me. Cruel, I know but graduate students are cruel. Then she sighed, looked down her nose and said "Kimberly, those were end of season basil plants. They're supposed to die. That's why they were on sale." 

Two lessons here: 
1. Always read the words before 'Sale.' Had I read them, I would have seen 'End of Season.'
2. Basil plants die in the Fall. Deal with it.

I stayed away from Basil for a long time and then last summer, I was given a Basil plant through our CSA. It died a terrible death. Granted when I replanted it into a bigger pot, there was only one leaf but I was optimistic. The next day the little leaf was laying on the ground. Did I give up? No. Then it rotted. Did I give up? Yes but I also decided that it was a sacrificial offering to other herbs in the pot and I felt better. 

Now this year I bought two Basil plants. I used a bunch of the leaves and now I am growing concerned. After removing all of the dead leaves, this is what remained.


One is doing significantly better than the other. As I told Manatee, the one on the right isn't dead but it is mostly dead. I guess you could also say it is a little alive but Basil brings out the pessimist in me.  


Any tips for bringing it back to life? 
Any tips for growing fresh Basil?
Making pesto? 
Bueller?

Tuesday, April 26, 2011

Time Saving Tips: Green Bay Packers Curry (?!)


Those of you who know me will know this was not the intention when I made a quick curry dish last week. After I finished it, I realized what I had done: Green fresh basil, Gold curry sauce, Gold peppers, Green broccoli, chicken over brown rice and Green spinach. Sigh. If it hadn't been so good, I wouldn't have photographed it.

Green Bay Packers Curry


1 bottle of Yellow Curry sauce
3 chicken breasts, sliced in thin strips
1 yellow pepper, sliced
1/2 onion, sliced
1 bag of frozen broccoli

1 cup of rice

Optional: Fresh spinach and fresh basil

1. Begin the rice, following directions on the bag. 

2. In a large saute pan or an electric frying pan: heat the pan to medium heat and spray it with olive oil or add a tsp of olive oil, swirling to coat.

3. Add chicken and sauce. Cook for 5 minutes, stir occasionally.

4. Add peppers, onions, and broccoli. Cover and cook until broccoli and chicken are cooked through.

5. For extra veggie bonus, place spinach on plate and then add rice. Serve sauce over rice and spinach. Top with fresh basil if you so desire.

Notes:
*"But rice takes so long! I don't want to wait for that." You can buy a cup of Uncle Ben's brown rice that you can put in the microwave for a minute and it's done. You could also use Instant Rice.

* "What if I don't like curry?" Try another bottled sauce and adjust the veggies accordingly. You could do the same with marinara, pasta sauce, or peanut sauce. 

* "I don't have time to slice vegetables." I happened to have sliced yellow peppers leftover from a pizza party. I could have easily omitted them or used additional frozen vegetables. As I have mentioned before, the frozen vegetables are great time savers and easy to use. When you cook broccoli fresh, they can be woody and hard to work with but frozen broccoli cooks quickly and easily.

Time Saving Ingredients:


Thursday, April 21, 2011

Easter Menu Tag: Appetizers!

I was invited by cajunliscious to participate in an Easter Tag Menu. I really appreciate the invite and hope all of you check out her amazing blog. Here was the invite:


It would involve for each person that is tagged, to come up with 5-10 suggested MENU ITEMS for EASTER. You have to upload these entrees, appetizers, desserts, from your previous posts with the photos, and link them back for the recipe.


Our Easter celebration is usually more of a potluck than a sit down dinner so in keeping with that theme, I decided to focus on recipes for appetizers.  

For some of my recipes, I decided to just paste in the recipe as the blog entry included more information than needed (apparently I have the tendency to ramble).  Some may not be as traditional, but all are delicious. Enjoy!


Balsamic Beets


1 cooked beet sliced
Splash of balsamic vinegar
Crumbled Goat Cheese
Salt
Pepper


Goat Cheese Empanadas


Ingredients:
Refridgerated Pie Crust 
Goat cheese 2 oz per pie crust


Spread out the pie crust. Cut small circles (approx. 3 inch diameter). I used a glass to do this. Put a LITTLE bit of goat cheese in center. Wet the outer edge of the circle and fold over. Then use a fork to press it together and give the edges a nice crimped look.


*You really only need a little goat cheese. I had a terrible experience making ricotta and jam pockets (shudder, cringe) and I put in too much filling. It was a mess! And it was disgusting so it was a lose-lose.


Bake at 375 for 20-25 minutes.


Mushroom Cheese Bread


Ingredients:

1 round loaf bread (preferably day old ot make it easier to cut but doesn't have to be)
8 oz. shredded Swiss cheese
8 oz. shredded Mozzzarella cheese
approx. 1/2 cup chopped sundried tomatoes
1 pear- cut into matchsticks and then cut those in half
6 oz. baby bella mushrooms, coarsely chopped


Sauce:


3/4 cup butter
2 parts poppyseeds (1-1 1/2 Tbsp)
1 part ground mustard
1 part season salt
2 parts lemon juice
3 green onions, finely chopped


Mix together cheeses, mushrooms, sundried tomatoes and pear in a bowl.


Cut the bread in diagnol rows and then cross hatch to you have 1 to 1 1/2 inch cubes. Go almost to the bottom but make sure it is still attached. guests will need to pull apart the bread.
Preheat the oven to 350.
Place bread on foil. Stuff ingredients into the bread. Fill in all crevices.
Melt sauce ingredients in a saucepan. As soon as butter is melted, remove from stove and pour over bread.
Wrap bread with foil. At this point, really work to get the bread back into a round shape by pulling the foil tight across it.
Put bread on cookie sheet and bake 40 minutes at 350.
Remove, Unwrap and Enjoy!


Caramelized Onion Dip

2 Tbsp of unsalted butter
2 medium onions, thinly sliced
1 8 oz bar reduced fat cream cheese
1 cup fat free sour cream
2 Tbsp of chopped fresh chives


Melt butter in large skillet over medium-low heat.
Add onions and 1/2 tsp of salt and pepper.
Cook until deep golden brown- the recipe says 30-35 minutes but that's a vicious lie. I cooked the onions for well over an hour.
Remove onions from heat and let cool.
Mix sour cream and cream cheese together.
Add cooled onions and mix well.
Fold in chives.

Serve with thick cut vegetable chips and veggies.


Tuesday, April 19, 2011

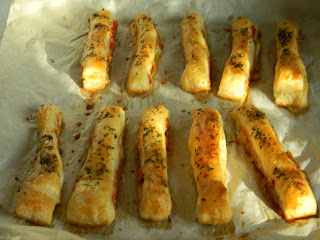
Pizza Puff Pastry Sticks

We had some family over a few weeks ago for dinner and originally I had planned to make Dijon Batonnes- an amazingly easy appetizer of puff pastry and Dijon mustard courtesy of Around My French Table by Dorie Greenspan. As the date got closer and I got thinking more about it, I realized that my teenage nieces may not be as keen on Dijon as I. Confession: I have been known to eat Dijon mustard out of the jar with a spoon. That is how much I love it. 

I knew that I wanted something that would keep the ease of the Dijon version (puff pastry + Dijon + egg wash + sprinkling of poppy seeds) but had ingredients that were a little more recognizable and palpable. The theme of the dinner was make-your-own-pizza so I decided to make a pizza version of the breadstick. Truth be told it was just as grown-up friendly as it was kid-friendly. It was a close race, but we ran out of this version before we ran out of the "adult" Dijon breadsticks.

Pizza Puff Pastry Sticks

1 sheet of puff pastry, thawed
1 1/2 Tbsp of tomato paste
1 Tbsp of chopped fresh basil (or 1/2 Tbsp of dried basil)
1 1/2 Tbsp of shredded mozzarella
1-2 Tbsp of water

Egg, whisked with a little cold water

Italian Seasoning or dried Oregano

  1. Cover baking sheet with parchment paper or spray with Olive Oil spray.
  2. Preheat oven to 400 degrees.
  3. Mix together tomato paste, basil and cheese. Add water until mixture is spreadable. 
  4. Roll out puff pastry dough so that it is about 12 x 16 inches.
  5. Cover lower half (on the short side) with tomato mixture leaving 1/8 inch around the edges.
  6. Fold dough over and seal around edges.
  7. Using a pizza cutter, cut into 1 inch strips.
  8. Transfer to baking sheet. 
  9. Brush on egg wash and sprinkle with Italian Seasoning (or dried Oregano).
  10. Bake 7 minutes. Rotate pan. Bake 7 more minutes or until golden brown. 


Monday, April 18, 2011

Time Saver Tip: Expedite Your Veggies!

As the weather turns warmer, Manatee and I have a major lifestyle shift: golfing, running and biking, oh my! The days get longer but time for cooking gets shorter. Enter the Badger Girl series of 'Time Saver Tips.' I am going to intersperse these with recipes and share with you little tidbits of knowledge while hoping to gain from you great boulders of knowledge. I am sure all of you have some great time saving tips for cooking and I would love to hear them.

Time Saver Tip #1: Expedite Your Veggies! Don't give up on whole foods and home-cooked meals in exchange for some meal in a box. There are quick, easy ways that allow you to include fresh vegetables without sacrificing time. 


Exhibit A: Frozen vegetables. I love fresh vegetables. Raw, steamed, grilled: I am a happy girl. Unfortunately, as our schedules pick up, fresh vegetables don't always get eaten and nothing smells worse than rotten broccoli or mushrooms. I know this from experience. Even worse: when you have both rotten broccoli AND mushrooms. Shudder. 
During these hectic times, I stock up on frozen vegetables. Now they have these great steam in a bag vegetables which makes cooking them even easier. Pop them in the microwave for a few minutes and you have fresh, steamed vegetables.  The traditional use would be as a side for some meat, but you can also toss them on a salad to make it more of a meal (I seem to connect warm food and cold lettuce with an entree salad) or toss them with pasta and sauce to make lazy spaghetti into a bistro dinner. 

WARNING: Avoid frozen vegetables in a fake chemical sauce. I know that lemon pepper butter sauce sounds good when you are in the store but trust me, it will taste so much better if you throw in a pad of butter and some herbs or pepper at home. Wouldn't you rather eat real, decadent dairy than dried chemicals? I know you would. Don't give in!


Exhibit B: The craft sale potato pouch. I do not know who invented this or how it is made but it is a true work of genius. Pop whole potatoes in this pouch, throw it in the microwave for a few minutes and you have a baked potato. No fork poking required! My mother told me she bought me one and I scoffed. She gave it to me and I rolled my eyes. Now I use it on a regular basis and would not dare part with it. I even take it to work with a potato to make a hot lunch. I have only seen these at craft sales and couldn't make my own if my life depended it. Put your friends, mother, aunts, sisters, anyone who goes to craft sales on the lookout for one of these. It's a great time saver. 


What tips and tricks do you have for expediting your veggies?

Sunday, April 17, 2011

The One Dish Week Plan

This is the plan for the week.


Chicken Spinach Lasagna: Eat and Repeat.

This was a conglomeration of three recipes (including a chicken enchilada recipe). I looked at even more recipes prior to get an idea of what I needed to make a traditional lasagna so I would have a better idea of how to improvise. I know I wanted to use chicken and lots of vegetables. I have to say that the result was amazing. Believe it or not, it is a 'light' lasagna in that it is healthy and you can eat a serving (or a serving and a half) and not feel like you have a brick in your stomach. Success!

Chicken Spinach Lasagna

1/2 cup chopped onion
2 garlic cloves minced
3 cups diced yellow squash
2 cups sliced fresh mushrooms
3 chicken breasts boiled* and cubed
1 container of frozen spinach, thawed and squeezed dry

1 can of crushed tomatoes, 28 oz
1 can of tomato paste, 6 oz

1 tsp sugar
1 tsp dried basil
1/2 tsp salt
1/2 tsp dried rosemary crushed
1/4 tsp of pepper

1 carton (15 oz) of no boil lasagna noodles**

1 carton of low fat ricotta cheese
1 3/4 cups of mozzarella cheese (or a blend of mozzarella, parmesan, or romano)

*I prefer boiling chicken breasts when I am putting them in a casserole. This has two major advantages. 1: It keeps the breasts moist. 2:I have very little contact with raw chicken breasts which is ALWAYS a good thing. They totally gross me out. 
To boil chicken breasts, put them in a saucepan and cover them with cold water. Bring to a boil on high heat and then turn down to medium heat and boil for 10-15 minutes. Remove, cool and dice.
**You can use regular lasagna noodles too. I'm just lazy. If you prefer the more work version, simply follow the instructions for cooking them. And if you live in the Madison area, I highly recommend RP Pasta Spinach Lasagna noodles. Yum.

  1. In a large saucepan (or electric frying pan), saute onion and garlic for 3 minutes or until onions are translucent. 
  2. Stir in yellow squash and mushrooms. Cook 5 minutes or until tender. 
  3. Add crushed tomatoes, tomato paste, spinach, chicken breasts and seasonings. Reduce heat and simmer for twenty minutes.
  4. While it's simmering, separate out 1 cup of shredded cheese. Mix remaining cheese and ricotta cheese together.
  5. Set two cups of sauce aside.
  6. Preheat oven to 350.
  7. In an ungreased 13x9 baking pan, layer 1/3 sauce, noodles and cheese. Repeat. Layer noodles and sauce on top of that.
  8. Cover with foil and bake for 45 minutes.
  9. Remove foil, add 1 cup of shredded cheese and put back in oven for 5-10 minutes or until the cheese is melted.
  10. Remove and let sit for 15 minutes. Note: This was by far the hardest part of the recipe but it's so worth because it gives the lasagna time to set. 
  11. Slice, serve and enjoy!!


Tuesday, April 12, 2011

Easy Fast Chicken Lettuce Wraps

This post has been a long time coming. Months ago, Cooking Light did a great issue on different ways of cooking chicken. One of them intrigued me; They talked about grinding skinless, boneless chicken breasts with strong spices or sauces in the food processor to make your own flavored ground chicken. To be honest, I was a little grossed out when I thought about grinding raw chicken, but I can tell you that it was totally worth it.  After it was cooked and I had my first sample, this turned into a 'Best Decision Ever' moment. It's my new favorite way of making lettuce wraps.


Red Curry Chicken Lettuce Wraps

3 Chicken Breasts
3-4 Tbsp of Red Curry Paste
1 tsp of salt

3 Small Cucumbers (English or Gourmet Minis), chopped
3 Green Onions, chopped
1-2 Tbsp Cilantro chopped

Butter or Boston Lettuce leaves

Sirracha Sauce

  1. Put chicken breasts, red curry paste and salt in food processor. Pulse until ground. It probably looks gross now. Trust me, it will look much better after the next step.
  2. Spray some olive oil in a frying pan on medium high heat. Add chicken to pan and fry until it is cooked through.
  3. Add cucumbers and onions. Cook 2-3 minutes. Add cilantro. 
  4. Spoon chicken mixture into lettuce leave. Top with Sirracha (if you dare). Note: It's also good with greek yogurt if the spice is too much for you. 


Wednesday, April 6, 2011

The Obsession Continues

Bread- 2.
Badger Girl- 1.

The Bread took this round.


So I was supposed to shape the dough into a tight ball (see above) but the dough was not cooperating (see below). 


This just about drove me nuts. The cookbook told me I needed to have iron hands with kid gloves. Really. How about a sledge hammer? Would that help? 


I don't have problems getting the dough to rise as seen above. It darn near rose off the pan. Again. 


Also, in the picture in the cookbook, there is this neat, art-y cross in the breads. You can almost imagine a portly baker dressed all in white when you see the crosses on the bread. Mine looked like I took a machete to it. 


My guest ate some of the bread toasted this morning and said it was good. I am still too mad. I had some after it came out of the oven and pronounced it a disaster. Manatee disagrees and has convinced me he likes it. When I stop pouting, I will probably try toasting it.


I am going to take a break from these sponge breads and return to some more basic recipes, things at which I have previously succeeded and enjoyed doing. This weekend we are having some of Manatee's family over for make your own pizza so I will be making the crusts the next few days. Hopefully I can rebuild my baking confidence. 

Thai Spring Roll Cups

This recipe came about from my love (and overdose) of Thai Spring Rolls and from having the Food Network on when I was organizing my closet (which was an all day event therefore lots of cooking shows).

Exhibit A: For our dinner party a few weeks ago, I got it into my head to make Thai Spring Rolls. Essentially basil, broccoli slaw, chicken, rice noodles, and hoisin sauce all wrapped up in rice paper. We had them for the party and then in an effort to use up leftovers, I continued making spring rolls, all week. Now I can't look at rice paper.

Exhibit B: Giada at Home. 

From Giada, I took the idea of the wonton wrappers. I brushed on Canola oil and then placed the wonton wrappers in a mini muffin pan. I baked them at 375 for 7 minutes, let them cool in the pan for 5 and then took them out to cool. Those would be the 'rice paper' of the spring rolls.

The main filling was chicken breasts ground in a food processor with hoisin sauce and Thai Chili Garlic Sauce. The ratio was approx. 3 breasts to 3/4 bottle of hoisin sauce to 1 Tbsp of Chili Garlic Sauce. As a warning, the ground chicken looked nasty. So nasty that I fried it up before my guest arrived because I wasn't sure if she would have wanted to see it if she saw it raw.

In each wonton, I put:

  • 1/2 leaf of fresh basil
  • a few rice noodles
  • ground chicken
  • dab of Sirracha 
  • broccoli slaw
The leftover meat we used for lettuce wraps which were amazing! We put some meat with a little hoisin, Sirracha and some broccoli slaw. Yum. 


Birthday Cake

Biggest lesson learned from making my own birthday cake: A common tip when you are frosting a double layer cake: "Place squares of wax paper under the cake when you are frosting. When you are finished, pull out the wax paper and there will be no frosting on the cake stand."
This is either a vicious lie or just another demonstration of my lack of coordination skills. I pulled out the wax paper and the cake almost came off with it. Then I was trying to pull the paper out while keeping the cake on the stand so there was frosting everywhere. Luckily I had extra frosting and some time before my guest arrived to clean up the stand. If anyone has any suggestions on how to get this tip to work: send them my way. I'm planning another cake for my nieces this weekend.


Tuesday, April 5, 2011

It's my birthday and I will bake if I want to...

Yes, it really is my birthday and this is the first time in a long time that I have had off on my birthday. Manatee and I went back and forth on whether to go out to eat or not, then I decided I wanted to make dinner for us and a very close childhood friend. This was for two reasons. One, and the more practical of the two, I have had a 'twitchy gut' as one of my friends calls it which is generally more twitchy after eating out. Some of it has to do with hidden fats and oils, some with bad luck, some with poor choices on my part. Secondly, I feel a lot of pressure on my birthday to do things, that I somehow need to live up to the day. In California, I had no plans one year so I booked a manicure, pedicure and massage. The massage released some kind of a emotional floodgate and I was left sobbing for an hour afterwards for no apparent reason. Lesson learned.

Since I like baking and cooking, I thought why not spend the day doing that and then have a nice, healthy, home cooked meal to share with the people I love. It was a bit of no-brainer. At first, I wanted to pull out all the stops and have some super fancy dishes I have never made before. That thought didn't last too long. I am going to some oldies but goodies with only exception being the appetizer which I am making up based on a couple of different recipes/ideas.

Shredded Carrot Salad (Around my French table)
Thai Spring Roll Cups
Chicken Pad See Ew (Ultimate cookbook with my own variations)
Double Layer Carrot Cake with Cream Cheese Frosting (An amazing Weight Watchers recipe so I can have it for breakfast the next day and not feel bad about it)

Notice the recurrence of carrots? This brings me to my next point. I hated, hated, HATED carrots as a kid. I thought they were the most repulsive thing ever. Too sweet to be a vegetable, not juicy enough to be fruit. It always amazes me how our tastes evolve throughout time. This is one of the reasons I keep my cooking magazines. Though I generally pull out recipes that appeal to me, I know that in three years, next year or even next month, I may have a new taste or developed a new liking to a food. I also try to keep trying foods even if I didn't like them before.

As a now older woman, that is my sage advice. You never know what you may start liking.